User Guide
How to use
Video Comparer is easy to use !
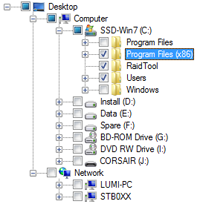
1. Select folders
Check the folders to scan, on the left panel.
You can expand the folders and check or uncheck some of them.
To scan hidden files, enable the option in settings configuration window.

2. Start analysis
Press start button.
During the analysis, a short report is displayed:
- the number of valid videos found
- the number of duplicate videos found
- the number of different duplicate group IDs found
- the number of comparisons processed per second

3. Validate duplicate videos
Validate the duplicate video.
Each couple of duplicate videos are displayed with:
- the image similarity rate
- the group ID
- a synchronized timeline thumbnails
To play a video, right click on the file name.

4. Clean duplicate videos
Manually check or uncheck files to be cleaned.
It is possible to uncheck all file names, by the Action button.
To clean files or to backup files, press Action, and select the action.
By default Video Comparer keep best video quality (image size & bitrate). You can change the auto selection method in settings configuration window.

5. Modify the scan mode if necessary
By default, the scan mode is standard. It is the best efficient mode for standard video.
Some of videos can be badly encoded, and Video Comparer needs to spend more time to analyze these videos. The status is tagged ‘Required scan mode Thorough’ in Scanned Files tab.
You can change the scan mode to thorough, but the processing time by video will be several minutes.

6. The next analysis
Information used by Video Comparer are saved in a cache file. The next analysis will be faster !


